

An Overview of Pool Table Parts and Layout
In many of our posts about how to play popular pool table games – including 8-Ball, 9-Ball, Cutthroat Pool and other fun billiard games – we mention different parts of the table in order to explain the basic rules of each game.
So, in order to understand the rules, you should at least know what these terms mean.
Luckily, pool table anatomy is pretty simple to grasp.
But to make it even easier for you, we’ve prepared a basic overview of pool table anatomy, including where things are on the table and what they mean.
Now when someone says something like “take the ball in hand behind the head string”, you’ll at least know what they’re talking about.

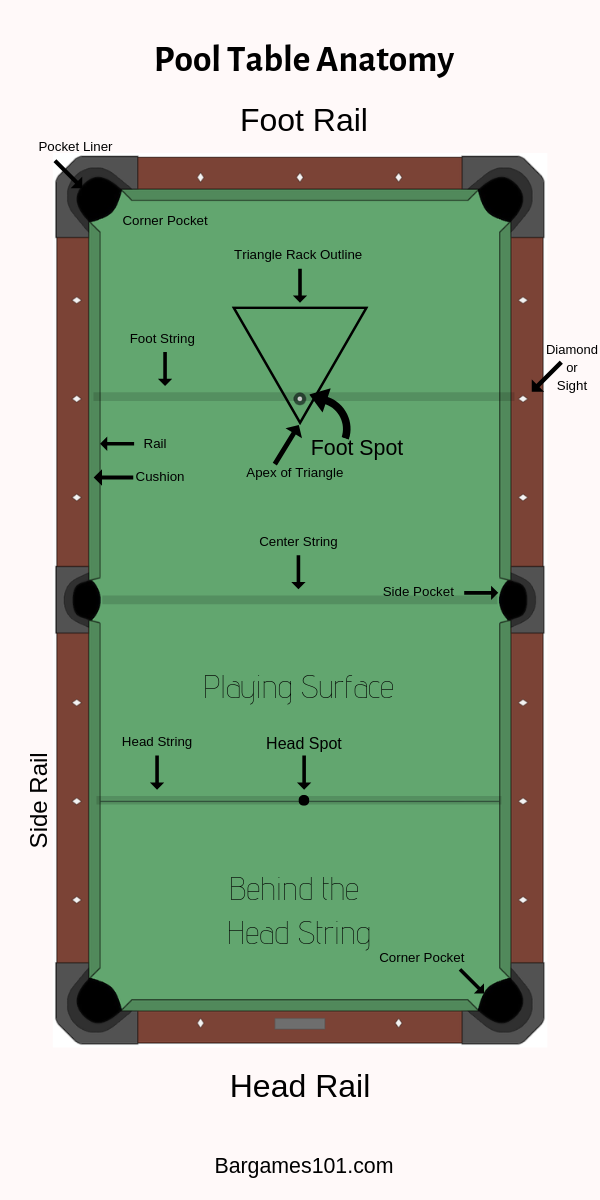
Pool Table Anatomy 101
Parts of the Pool Table Defined
Apex of the Triangle
This is the top of the rack. In some games, you must place a specific ball at the top (i.e. the 1-ball in a game of 9-ball) and line it up with the foot spot.
Center String
The center string runs between the two side pockets and intersects the center spot (dead center of the pool table). This is an imaginary line used as a reference point.
Corner Pockets
There are four corner pockets on a pool table. Get to know these when you start calling your shots (i.e. 5-ball, right corner).
Related: How to hold a pool cue.
The opening of a corner pocket (aka “mouth”) should measure 4 ⅞ inches minimum to 5 ⅛ inches max in width. The angle of a corner pocket entrance is 142° (± 1°).
Cushion
The cushion is the felt covered rubber interior of the rails on the pool table. For example, you may hear that balls must be driven off the cushions on a break. Cushion is often used interchangeably with the term “rail” or “bank”.
Diamonds (aka Sights)
The diamonds on the table rails are used as references or target points. These inlaid markings are spaced at one-fourth increments along the short rails (ends of the table), and one-eighth increments along the long rails (side rails).
For advanced players, the diamonds are used to take advantage of “the diamond system“; a mathematical approach to planning shots using multiple banks.
The rest of us use the diamonds to help us aim and to understand where the head string and foot string are.
Related: A look at some of the best pool movies with an analysis of trick shots.
Foot of the Table
This is end of the table where the balls are racked. You break towards the foot of the table from the head of the table.
Foot Spot
The foot spot is the spot at the foot end of the table between the second diamonds on the long rail. It also lines up with the center diamond on the short rail.
This is the “racking end” of the table, where you “spot the ball”, and where you should line up the top object ball when racking a game of 8-ball or 9-ball.
The “foot spot” is commonly referenced in the rules and instructions for most pool games. Now you know exactly where it is!
Related: How to get better at pool with practice.
Foot String
The foot string is an imaginary line between the second diamonds on the long rail at the foot end of the table. It passes through the foot spot. This is mainly used as a reference point for positioning and understanding the layout on a table.
Head of the Table
This is the end of the table where the shooter breaks from. This is also where the pool table manufacturer usually places their nameplate.
Related: Do you really need a breaking cue?
Head Spot
Opposite the foot spot is the head spot. This point is where the imaginary line of the head string intersects between the second diamonds on the long rail, and the center diamond on the short rail.
Head String
The head strong is an imaginary line that runs at the head of the table between the second diamonds on the long rail.
The area behind the head string is where you break from, and where you must place the cue ball in a game of 8-ball after a scratch, for example.
You’ll commonly see that, in a game like 8-ball, the cue ball must be taken “in hand behind the head string”. This just means you can place the cue ball anywhere behind the second diamonds on the long rail.
If your table does not have diamonds or sights, you now know that the head string is behind the “head spot” to make things easier.
Playing Surface
The playing surface is the flat, level (hopefully), felt covered surface that you play pool on. The playing surface on a higher quality table is made from slate. These tables must be installed and leveled properly, usually by professionals.
Lighter and less expensive pool tables use an MDF playing surface. These will not last as long and are prone to warping, but are often good budget friendly options.
The playing area for a full size table should measure 50″ x 100″.
Related: An overview of the best beginner pool cues.
Side Pockets
There are two side pockets, positioned at the center of the table. The openings should measure between 5 ⅜ and 5 ⅝ inches wide. The angle at a side pocket entrance is 103° (± 2°).
There you have it. A basic overview of parts of the pool table.
When you understand pool table anatomy, you’ll have an easier time learning how to play new games and how to execute challenging shots.
Then it’s time to tackle your next challenge: Learning how to play straight pool.


